Magi
Two years ago, I submitted to the Chess Variants website my 10x10 chess variant which I called Magi. I am submitting the slightly revised rules for Magi into the 10th anniversary CV contest.Inspirations:
We all love the game of orthodox chess. Like some players, however, I am dismayed at the importance of knowing opening theory and seeming rote memorization. Reading comments made by various grandmasters in Chess Life magazine about how computers and the Internet have influenced (ruined) the game have added to the impetus of some players to come up with new ideas for Games Like Chess. I wanted to create a 10x10 variant which would feel much the same as chess, keeping what I feel are its important features such as pawn structures and tradeoffs between pieces that are roughly equal in strength but have different movement powers (aka bishops vs. knights in orthodox chess). But I also wanted to (if I could) allow players to purpose different play patterns, such as potentially cutting off one side of play of the board from the other, partially shifting power from the center of the board towards the sides, and allowing playing styles that would not necessitate castling if the player chose to play that way. I have submitted sample games along with this page to show players what I mean by this.
Because of
the nature of 2 player, turn based games with each player possessing
perfect information, if one of the players manages to gain an advantage
in material over the other player, then life often becomes very difficult
for the player who is down on material. Chess players know that winning
an exchange or gaining an advantage of 1 - 2 pawns in material is frequently
enough for the player with material advantage to convert into a victory.
The advantage in material needed to win is often surprisingly small,
amounting to 1 - 5 percent of the entire strength of the army that is
given to players. I wanted Magi to be a game where players could conceivably
lose entire pieces (5 percent or more) of material and still have the potential
to win. I will show a sample game which I played against the Zillions
of Games program where I was actually 3 full pieces down at a single move
during a game and still managed to pull out a victory.
Perhaps most
importantly, I realized during play testing that a game of Magi
takes somewhere between 20 - 150 moves to come to a resolution.
In 2 player, turn based games like chess where both players have perfect
information, usually at some point in the game the balance of power
tips in favor of one of the two players. I realized that playing a lengthy
game where one of the players has gained an advantage can be rather depressing
for the losing player, unless of course the player with the advantage
fails to convert his / her advantage into victory. Therefore I was inspired
to devise another set of outcomes that differ from the normal outcomes
that occur in chess - i.e. win - loss, loss - win, draw (1-0, 0-1, 1/2
- 1/2). I believe that my new idea for outcomes (which involve playing
for more than one point) will help inspire players of lengthy 2 player
games in such a way that even players who are losing will continue to
play to the best of their ability. This is because they will see that
they will still have something to play for even if they are being badly
beaten by their opponents.
Rules:
Board
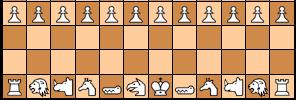
and Opening Setup: Magi is played on a 10x10 board. Each
player starts off with an army of 24 pieces, including a King,
12 Pawns, 2 Rooks, 2 Bishops, 2 Knights, 2 Dukes, an Cardinal,
a Queen, and a Wizard. The initial piece setup is shown in
the picture depicted below. WP = White Pawn, WN = White
Knight, WB = White Bishop, WC = White Cardinal, WQ = White Queen,
WK = White King, WW = White Wizard, and WD = White Duke. Likewise,
B(X) = the corresponding Black pieces. |::::| = a colored square
and if the square has :letters:, then it is a square occupied by a
piece. Of course, the table below denotes the ranks and columns at
the right hand side and at the bottom of the table respectively.
| BR |
:BN: |
BB |
:BC: |
BQ |
:BK: |
BW |
:BB: |
BN |
:BR: |
10 |
| :BP: | BP |
:BP: |
BP |
:BP: |
BP |
:BP: |
BP |
:BP: |
BP |
9 |
| BD |
:::: |
:BP: |
:::: |
BP |
:::: |
:BD: |
8 |
|||
| :::: |
:::: |
:::: |
:::: |
:::: |
7 |
|||||
| :::: |
:::: |
:::: |
:::: |
:::: |
6 |
|||||
| :::: |
:::: |
:::: |
:::: |
:::: |
5 |
|||||
| :::: |
:::: |
:::: |
:::: |
:::: |
4 |
|||||
| :WD: |
:::: |
WP |
:::: |
:WP: |
:::: |
WD |
3 |
|||
| WP |
:WP: |
WP |
:WP: |
WP |
:WP: |
WP |
:WP: |
WP |
:WP: |
2 |
| :WR: |
WN |
:WB: |
WC |
:WQ: |
WK |
:WW: |
WB |
:WN: |
WR |
1 |
| A |
B |
C |
D |
E |
F |
G |
H |
I |
J |
PIECE MOVEMENTS:
In this game, the King, Queen, Rooks, Knights, and Bishops all move (and capture) as they do in orthodox Chess. Note the change in the rules on castling below.
Pawns: In general, pawns act much as they do in orthodox Chess. Pawns may move only in a forward direction except when capturing. The pawns that are on the third and eighth ranks (located at squares D3, D8, G3, and G8 at the beginning of the game) can move 1 or 2 squares forward on their first move. All other pawns can move 1,2, or 3 squares forward on their first move. Afterwards, pawns are allowed to move only one square forward every time the pawn moves, unless the Pawn performs a capture move. If a player moves his / her pawn one or two squares on the first move, they still may move their pawn only square forward (unless performing a capturing move) from then on. Pawns are not allowed to jump or move over pieces that are in its path on its first move.
Pawns capture opposing pieces in a diagonal move as they normally do in orthodox Chess. Pawns can perform a standard orthodox Chess En Passant capture move of their opponents' pawns if their opponents move their pawns from their original positions to either the 4th or 5th ranks - if Black, or to the 6th or 7th ranks - if White on their first move of that pawn.
Additional clarifications of En Passant captures are needed in this game. If a player moves his or her Pawn two or three squares forward on that Pawn's initial move, and the opposing player is in possession of 2 Pawns that are "doubled up"on a file that is adjacent to the file of the recently moved Pawn, then the opposing player has the following options regarding how to react to the Pawn move:
If the player playing White moves a Pawn forward to the 5th rank (or 6th rank if playing Black), and the opposing player has Pawns on the 4th and 5th ranks (if White) or the 6th and 7th ranks (if Black) on an adjacent file, then the opposing player can capture the Pawn with either of his/ her Pawn's on the adjacent file in an En Passant manner.
Example #1: White has an unmoved Pawn on the C2 square and Black has doubled Pawns on B4 and B5 :
If White moves his / her Pawn to C4, then the B4 pawn can capture only by En Passant methods only. However, the pawn on B5 can capture as a Pawn normally would in Chess. If White moves the Pawn to C5, then either the B4 or B5 Pawn can capture the White C Pawn, but they can do so only by the En Passant method.
The same moving and capturing principles hold if players has "tripled up" pawns on adjacent files. If White has a Pawn on C2 and Black has Pawns on B4, B5, and B6, then if White moves his / her Pawn to C5, the Black Pawns on B4 and B5 can capture via En Passant, while the B6 Pawn can capture by normal means. If the tripled up pawns are on B3, B4, and B5, then only the B4 and B5 pawns can capture the opposing pawn.
In the case of the D and G pawns, opposing players can make En Passant captures of these pawns if they have pawns on either the 4th or 5th ranks (if Black) or 6th and 7th ranks (if White).
Example #2: White has pawns on the C6 and C7 squares and Black moves her D8 pawn forward one square to D7. White can capture the D pawn with the C7 pawn En passant or can capture normally with the C6 pawn. If Black moves her pawn to D6, either the C6 or C7 pawn can capture via En passant.
Promotion of Pawns: Pawns may promote to pieces when they reach the last rank on the opposing side of the board as in orthodox Chess. Pawns may be promoted to a Queen, a Duke, a Rook, a Bishop, a Knight, an Cardinal, or a Wizard.In practice, players will either promote to either Queens or Wizards.
Dukes: Dukes can move 1 - 3 squares in a horizontal or vertical direction, controlling anywhere from 6 - 12 squares. Dukes are line pieces and cannot jump over other pieces. Players can think of the Duke as being a weak Rook with a short reach.
The Cardinal:
Is also a line piece. His holiness can move either as a
King (one square horizontally, vertically, or diagonally), or
as a Bishop in orthodox Chess. The Cardinal can control 11 - 21
squares.
The Wizard:
The Wizard can move (1) one square horizontally or vertically, (2)
jump as a Knight in orthodox Chess - or (3) jump 2 squares
diagonally. Therefore the Wizard can control 5-16 squares.
A Wizard thus combines the moving powers of a Wazir, an Alfil,
and a orthodox Chess Knight.
Castling: The King can execute a castle move as in orthodox Chess, but when the his Majesty castles, he moves 3 squares in the direction in which he is castling instead of two squares. Therefore, if the White King castles "kingside", he moves to to the I - 1 square, while the kingside Rook at J -1 moves to the H - 1 square. If the King castles to the "queenside", he moves to the C - 1 square, while the queenside Rook at A - 1 moves to the D -1 square. For the Black King, castling "kingside" means moving to the I - 10 square, while the kingside Rook moves to H - 10. Similarly, castling "queenside" means moving to the C - 10 square, while the Rook moves to D - 10. All other rules regarding castling are the same as the are in orthodox Chess.
Object of Game:
Players can play for two types of outcomes:
1) They can play for standard 1 point outcomes of orthodox chess (win - loss, loss - win, or draw). If you want an all out battle, win or lose, do or die, and where opponents want to crush each other, then choose this option. All rules which pertain to outcomes in orthodox chess (fifty move rule, stalemates, etc) are the same in Magi.
2) A new set of outcomes involving play for 12 (or more points). This option requires much greater thought on the part of players as to how they are going to maximize their payoffs. This method of play more resembles the real world where wars often result in exhausted, fruitless,or hollow victories, or perhaps sudden crushing victories because one of the two players fails to comprehend how strong or weak their position is.
This system works as follows:
A) CHECKMATES AND RESIGNATIONS: A checkmate results in a 12 point payoff to the winner and 0 points to the loser.
At the outset of this form of the game, players are playing for a checkmate outcome. A player who is threatened with checkmate may offer to resign the game. Only one resignation offer may be offered per game! Once one player makes an offer to resign to the other player, no more resignation offers may be made by either player for the rest of the game and play resumes with any outcomes still possible. More rules regarding Resignations and resignation payoff matrix are both covered in rules described in section D below.
B) "STALEMATES: A stalemate results in a 7 point payoff to the player who stalemates the other player, while the stalemated player receives 5 points. Playtesting indicates that stalemate outcomes occur in less than 1 percent of games in Magi.
C) DRAWS: Any form of draw (outside
of a draw that arises from stalemate) result in a 6-6 point payoff
for each player. All methods of drawing games and rules regarding
draws that exist in orthodox Chess are still in effect in Magi.
Playtesting indicates that draws are also rare in Magi, occuring
in less than 5 percent of games.This achieves one of my desires for
a chess variant in that draws are relatively rare.
Draws may be made at any time during the game. Only one draw may be offered per game! Once one player makes a draw offer to the other player, no more draw offers may be made by either player for the rest of the game. Draws by other methods can still arise. If the player who has been offered the draw refuses the offer, then the rules that govern resignations (see below) come into effect. Players may offer to resign after a draw offer has been made by one player to the other, but refused. Players may also offer to draw after a resignation offer has been offered, but subseqently refused provided that a draw offer has not been previously made. Offering a draw after refusing resignation would appeal to players who are playing under the optional 150 move rule (see below), as accepting a draw would save a 6-6 outcome rather than resulting in a 0-0 outcome. To stave off a 0-0 outcome, a formal offer of a draw must be made and accepted. Conceivably, if players are playing in a tournament situation and both players hate each other, then one of the players could spite the other player by intentionally accepting a 0-0 outcome! This idea is meant to give weak players a powerful weapon to use against very strong players, if they manage to play all the way to 150 moves.
D) RESIGNATIONS: As described in section A above, only one resignation offer may be made per game. If the resignation offer is accepted, the game outcome is described by the payoff matrix described below. Likewise, if the resignation offer is declined, play resumes until an outcome is reached described by the payoff matrix below.
E) OPTIONAL RULE REGARDING GAMES THAT
LAST MORE THAN 150 MOVES: Such games result in a 0 - 0 outcome. Players
may disregard this rule at their discretion.
VICTORY / LOSS PAYOFF PAYOFF MATRIX:
As noted above, players are automatically
playing for a checkmate payoff until either a resignation offer
is made, a draw offer is made, or if a draw or a stalemate outcome
arises. In the payoff matrix band described below, a resignation before
move 45 results in a 12 - 0 payoff. This is to reflect the brilliant
(or horrible!) play that is needed to achieve such a result. Players
who play so badly that they get checkmated so early in a game such as
Magi deserve to be fully punished!
A resignation offer by one player to the
other which is not accepted causes game play to continue. If the player in
the superior position achieves a checkmate within the current game band of
moves, then the result is a 12 - 0 payoff to the victor no matter which
band of moves the players happen to be in. For example, if a game
has reached move 53 and player B makes a resignation offer to player A
but player A refuses the offer, then if player A then proceeds to checkmate
player B (say) at move 58, then player A gets a 12 point payoff victory,
while player B gets zero. The idea is that players who are in the weaker
position will always have at least a glimmer of hope for something better
(as long as they aren't checkmated very early in the game), but they have
to make the best of their poor situation in order to be rewarded. Players
who are in the weaker position still have to watch out, as players
who are in the stronger position can still achieve an 12 - 0 absolute
victory if they analyze the situation correctly and play their cards
right.
NOTE:
A resignation offer that is not accepted sets the terms of payoff
such that if a checkmate is not achieved within the current
band of moves, the payoff then becomes whatever the payoff happens
to be when the checkmate is actually achieved. See rules
on draws and resignations above. For example, if a player offers a
resignation on move 68 (which would result in a 10 - 2 outcome in
the payoff matrix below), and a checkmate is not achieved by the start
of move 76, the payoff outcome immediately becomes 9 - 3. This lowered
payoff is the case even if the player who is in a superior position
manages to achieve a checkmate outcome against the other player in subsequent
play. Moreover, if a player still has not achieved a checkmate within
the next band of payoffs in the payoff matrix (by the start of move 91
for example), then payoff then becomes a 8 - 4 payoff, and so on. The
idea here is that the player who was in the superior position when the
resignation offer was made should have taken the resignation offer because
they are proceeding to throw away their advantage with continued play.
In other words, the player who was in the superior position should have
quit while they were ahead.
The
rules regarding payoff matrices are not set in stone. Players
may experiment with other payoff matrices, but keeping the spirit of
these ideas. For example, payoffs may be set with different move bands
(say moves 41-60, 61-80,etc) or setting the payoff for the first set of
bands at 10 - 2. Players could play for other stakes, such as 16 points.
This can be done at players' discretion.
The general idea with payoff matrices
and multipoint game payoffs is that victories are rarely clean
and complete. Sometimes wars are long and drawn out, with either
side beating each other to a pulp. Sometimes wars result in so
- called "hollow victories".
What this payoff matrix introduces is the
idea that players who are losing will still have incentives to play to
the best of their ability. These ideas make players think very hard about
the terms regarding the game's outcome. Players who are in an inferior
position have to try to determine when to sue for surrender, or whether they
can continue to hold on and hope for better fortunes.. Players in superior
positions have to determine whether they can in fact achieve that truly sweeping
victory, or whether they should perhaps settle for what they already have.
They also help to keep lengthy games interesting.
SAMPLE PAYOFF MATRIX:
| Number
of Moves Played: |
Player Offers Resignation
/ Resignation Accepted |
Player
Offers Resignation / Offer Declined / Subsequent checkmate
occurs within current # range of moves |
Player Offers
Resignation / Offer Declined / Subsequent checkmate does
not occur within current # range of moves |
| 1 - 45 |
12 - 0 (Resignation counts as Checkmate) |
12 - 0 (Counts as Checkmate) |
11 - 1 ( payoffs go to next payoff band. See NOTE
above) |
| 46 - 60 |
11 - 1 |
12 - 0 |
10 - 2 ( See NOTE above) |
| 61 - 75 |
10 - 2 |
12 - 0 |
9 - 3 ( See NOTE above) |
| 76- 90 |
9 - 3 |
12 - 0 |
8 - 4 ( See NOTE above) |
| 90- 119 |
8 - 4 |
12 - 0 |
7 - 5 ( See NOTE above) |
| 120-150 |
7 - 5 |
12 - 0 |
0 - 0 |
| 151+ (optional) |
0-0 (optional) |
0-0 (optional) |
0-0 (optional) |
Sample Games:
All of these sample games were played against the Zillions of Games program. I have made a Magi ZOG file available online. Unfortunately the ZOG program only allows 1-0, 0-1, 1/2 - 1/2 type outcomes, so I cannot offer examples of what my alternate outcomes might be like.
Game #1: The first sample game I am offering was played on September 12, 2003. I was playing Black, while the program (of course) was White. At 20 moves, this is the shortest game I have ever played against the ZOG program. I started off the game with a massive buildup in the middle, which boded very well for me in the future - or so I thought. In the last move, the ZOG program offered a brilliant Queen sacrifice which I took almost without thinking. The White Wizard was lying in wait, ready to blast my Monarch dead with a spell that took advantage of my own stupidity. I was absolutely stunned at what had happened!
| Move |
White |
Black |
Comments |
| 1 |
Knight b1-c3 |
Pawn d8-d6 |
ZOG often comes out with knights
|
| 2 |
Knight i1-h3 |
Pawn c9-c6 |
|
| 3 |
Knight h3 - g5 |
Pawn d9-d7 |
|
| 4 |
Duke j3 - j4 |
Knight i10-h8 |
|
| 5 |
Pawn j2-j3 |
Pawn f9-f6 |
|
| 6 |
Knight g5-h3 |
Pawn e9-e6 |
|
| 7 |
Duke a3-a4 |
Bishop c10-f7 |
|
| 8 |
Duke j4-g4 |
Pawn g8-g7 |
|
| 9 |
Duke a4-b4 |
Pawn b9-b8 |
ZOG thinks I may attack Duke? |
| 10 |
Pawn a2-a5 |
Pawn g9-g8 |
|
| 11 |
Wizard g1-f3 |
Bishop h10-e7 |
ZOG likes this position for Wizards |
| 12 |
Duke b4-c4 |
Wizard g10-e8 |
|
| 13 |
Pawn e2-e4 |
Knight b10-c8 |
|
| 14 |
Queen e1-e3 |
Cardinal d10-e9 |
|
| 15 |
Pawn b2-b4 |
Knight h8-g6 |
|
| 16 |
Wizard f3-h5 |
Knight g6-h5 |
I have a massive buildup here.
|
| 17 |
Wizard h5-j7 |
The White Wizard moves into position
to strike. |
|
| 18 |
Wizard i7-i6 |
Knight e5xc4 |
First piece to be taken in the
game. |
| 19 |
Queen e3xj8 |
Pawn i9xj8 |
A Queen sacrifice. |
| 20 |
Wizard i6-h8 |
Checkmate! My own Wizard, Cardinal
and Queen inadvertently contribute to my King's demise! |
Game #2: I played this game against the ZOG program on December 17, 2004. This game, where ZOG is playing White and I am playing Black, features an early Queen raid by White. However, I discovered an idea where I was able to trap the White Queen by making 5 consecutive moves with my queenside Knight which transferred the Knight all the way across to the kingside of the board to execute the trap! Trapping the White Queen resulted in a tradeoff where I lost a Rook, a Pawn, both of my Knights, as well as being left in a tight defensive position where I was not able to castle.
Unfortunately for White, the program had not fully mobilized its pieces and that left me with a slim opportunity. Sacrificing my long ranged fianchettoed Bishop for a Knight, I counterblasted White's queenside castled position open. My Cardinal was in position to making things uncomfortable for White's King and had the power to guide 1 of 2 pawns towards promotion. Meanwhile White launched a counter - counter attack(!), but didn't have enough troops in place to overcome my razor thin defenses. A last ditch effort by the White Wizard to perpetual check my King was blocked when my Monarch was able to find shelter behind my two remaining kingside pawns! With the lowly peasant pawns holding off the White Wizard, my Cardinal and a newly promoted Queen make short work of White's failure to mobilize its pieces and checkmate follows at move 66.
| Move |
White |
Black |
Comments |
| 1 |
Knight b1-c3 |
Pawn d8-d6 |
|
| 2 |
Pawn e2-e4 |
Pawn d9-d7 |
|
| 3 |
Duke j3-j4 |
Pawn e9-e6 |
|
| 4 |
Knight i1-h3 |
Pawn c9-c6 |
|
| 5 |
Pawn d3-d5 |
Pawn b9-b7 |
|
| 6 |
Pawn d5xe6 |
Pawn d7xe6 |
First blood drawn |
| 7 |
Pawn d2-d5 |
Bishop c10-f7 |
|
| 8 |
Bishop c1xj8 |
Knight i10xj8 |
Tradeoff: Bishop for Duke |
| 9 |
Pawn d5xc6 |
Pawn b7xc6 |
|
| 10 |
Queen e1-e3 |
Cardinal d10-e9 |
|
| 11 |
Cardinal d1-e2 |
Pawn i9-i8 |
|
| 12 |
Queen e3-d4 |
Duke a8-d8 |
The Queen is in position to execute the
Queen raid. |
| 13 |
Queen d4 x j10 |
Bishop h10-i9 |
I completely missed this. My pawn front
was weak and the White Queen had generated a double threat. |
| 14 |
Queen j10xj9 |
Knight b10-d9 |
Queen has now taken a Rook and a Pawn.
However, help is on the way from the other side of the board! |
| 15 |
Duke a3-a6 |
Knight d9-b8 |
Note that the Black Wizard has the power
to singlehandledly hold the kingside defenses together, but at the cost
of being immobilized. The Queen raid position is locked. |
| 16 |
Duke a6-b6 |
Queen e10-c8 |
|
| 17 |
Duke b6-b4 |
Knight b8-d7 |
|
| 18 |
Wizard g1-e3 |
Knight d7-e5 |
|
| 19 |
0-0-0 |
Knight e5-g6 |
|
| 20 |
Duke j4-j6 |
Knight g6-h8 |
White has suddenly seen that my goal is
to win the Queen! White moves his kingside Duke to exact retribution. |
| 21 |
Duke j6xj8 |
Knight h8xj9 |
I have captured the White Queen. This Knight
has made 7 of my last 8 moves. |
| 22 |
Duke j8xj9 |
Pawn a9-a6 |
The dust has settled on the White Queen
raid. |
| 23 |
Duke b4-b6 |
Pawn a6-a5 |
|
| 24 |
Knight h3-g5 |
Bishop f7-g6 |
|
| 25 |
Pawn h2-h5 |
Bishop g6-e8 |
|
| 26 |
Pawn f2-f4 |
Pawn c6-c5 |
|
| 27 |
Duke b6xd6 |
Duke d8xd6 |
|
| 28 |
Rook d1xd6 |
Pawn a5-a4 |
|
| 29 |
Knight g5-e6 |
Cardinal e9-a5 |
|
| 30 |
Pawn a2-a3 |
Bishop i9xc3 |
I was very fortunate that ZOG played this
move. I felt sure White was going to swipe my last advanced queenside pawn
at C5 |
| 31 |
Pawn b2xc3 |
Cardinal a5xc3 |
My Bishop sacrifice has been executed.
My hopes now rest on my Cardinal. |
| 32 |
Duke j9xh9 |
Rook a10-b10 |
White decides to eat material here instead
of develop. |
| 33 |
Wizard e3-d1 |
Cardinal c3-a1 |
Cardinals wield great power when they are
in corners of the board. |
| 34 |
King c1-d2 |
Pawn c5-c4 |
The situation is much to uncomfortable
for the White King. |
| 35 |
Wizard d1-e3 |
Pawn c4-c3 |
|
| 36 |
King d2-e1 |
Cardinal a1-b2 |
|
| 37 |
Cardinal e2-a6 |
Queen c8-a10 |
I felt certain White was going to threaten
my Queen with a Rook move to D8. |
| 38 |
Knight e6-g7 |
Cardinal b2xa3 |
|
| 39 |
Knight g7xe8 |
Wizard g10xe8 |
I knew White would use the Knight to take
my Bishop. |
| 40 |
Duke h9-h10 |
King f10-e9 |
Black was in check. |
| 41 |
Cardinal a6-d9 |
King e9-f8 |
My Monarch is in check again. |
| 42 |
Cardinal d9xe8 |
King f8xe8 |
Only my nearby pawns are left for immediate
defense of my Monarch. I was extremely fortunate that the White Rook was
occupying the one square that could have been used for immediate check by
the White Wizard. That could have been the start of an attack would probably
have been fatal. |
| 43 |
Wizard e3-c4 |
Cardinal a3-b2 |
|
| 44 |
Duke h10-h9 |
Pawn a4-a3 |
|
| 45 |
Rook d6-e6 |
King e8-d9 |
Check by the White Rook. At all costs,
I have to stay at least 1 move away from the White Wizard. |
| 46 |
Duke h9xg9 |
Rook b10-f10 |
Just about forced. The White Duke would
have taken my last pawn with check. My defenses have nearly been destroyed.
|
| 47 |
Rook e6-d6 |
King d9-e9 |
Check again. I need to get out of the open
and behind my last two central pawns. |
| 48 |
Rook d6-a6 |
Queen a10xa6 |
Sacrifice of the Queen. I think that White's
attack has run out of gas and that the Cardinal can promote the pawns. |
| 49 |
Wizard c4xa6 |
Pawn a3-a2 |
|
| 50 |
Wizard a6-c8 |
King e9-f8 |
Check by White. White cannot stop the promotion
of my pawn. |
| 51 |
Duke g9xg8 |
King f8xg8 |
The Black King slays the White Duke!
|
| 52 |
Wizard c8-e7 |
King g8-h9 |
Check. |
| 53 |
Wizard e7-f7 |
King h9-i9 |
Check again. |
| 54 |
Wizard f7-g7 |
King i9-j9 |
Check once more. This time however, a lowly
Pawn stands in the way of the White Wizard! The Black Rook still defends
the other Pawn and holds the last defense together. |
| 55 |
King e1-e2 |
Pawn a2-a1 |
Promotion of the A Pawn to Queen. White
is now in trouble. |
| 56 |
Wizard g7-h9 |
Cardinal b2xc2 |
|
| 57 |
Pawn g3-g4 |
Queen a1-d1 |
Check. The White King is under attack!
|
| 58 |
King e2-f2 |
Queen d1-d4 |
Check again. |
| 59 |
King f2-g3 |
Cardinal c2xe4 |
|
| 60 |
Wizard h9xf10 |
Cardinal e4xf4 |
The White Wizard tries to undermine the
last defenses guarding the Black King. Black responds with check. |
| 61 |
King g3-h4 |
Cardinal f4xg4 |
Check again. The final king hunt as started.
|
| 62 |
King h4-i4 |
Cardinal g4-h4 |
Check. |
| 63 |
King i4-j5 |
Queen d4-g7 |
|
| 64 |
Wizard f10-h8 |
Queen g7-h8 |
The White Wizard has finally managed to
gain a check against the Black King, but it is too late. The Black Queen
has guarded the threatening square since move 58. |
| 65 |
Pawn i2-i5 |
Queen h8xh5 |
|
| 66 |
Pawn j2-j4 |
Queen h5-j7 |
Checkmate. |
Game #3: This is the game which I promised that I would show where I was down 3 entire pieces for one hair raising move. This occurs on move 56 of this game, where ZOG played White and I played Black. The game starts off routinely enough, with ZOG taking my kingside Duke with a Bishop. Development follows where I castle kingside, while trying a Wizard raid against White. White successfully counters my Black Wizard raid, but I do manage to force White to give up castling. Instead, the White Monarch takes up position behind a seemingly impenetrable wall of pawns located just right of center of the board.
Unfortunately for me, I happen to have left the J column open for the launch of a potential attack. On move 33, White does just that, moving the Queen into a strong position to exploit my rather weak kingside defenses. I end up taking an uncompensated hit from the White Rook on move 34. I end up playing the next 12 moves (or more) down roughly an entire Duke in material, which is about 7-8 percent of my army. By move 44, I am down a piece and a pawn. At this point, I was desperate. It seemed that ZOG was simply going to grind me down and win.
So with nothing to lose, I came up with a plan to launch one last desperate attack directly against the White King with my long range pieces, Rooks and the Queen. The idea was to drive the enemy King out from behind his wall of pawns and into the open, where if (a BIG if) everything went according to plan, I could somehow catch the enemy King in a dragnet and close in for the kill. If that failed, I thought I could at least somehow win some material and live to fight the last battle on more even terms.
So I launched the last attack. Not only was I down three pieces for one brief moment during the attack, I was down 2 pieces for 3 turns! Amazingly, the attack worked as planned. I spotted an opportunity to bring my last piece, my fianchettoed Bishop into the attack which would checkmate the enemy Monarch. To ward this off, White was forced to sacrifice the Queen for my Bishop on moves 63 - 64. This brought back the game into rough material balance, with White possessing a Duke, Cardinal, and a Wizard against a Black Rook, a Black Queen, and an extra pawn. I made sure to destroy the White Cardinal, the only long range piece White had left on the board with my Rook. From there, it was a 50+ move grind (which included having to overcome a barrage of checks by the White Wizard on moves 81-97) to a final checkmate against the White King, which was achieved on move 123.
1. Pawn e2 - e5
1. Pawn e9 - e6
2. Knight b1 - c3
2. Pawn c9 - c7
3. Pawn d3 - d5
3. Pawn f9 - f7
4. LPawn d5 x e6
4. Pawn f7 x e6
5. Pawn d2 - d4
5. Pawn i9 - i8
6. Bishop c1 x j8
6. Knight i10 x j8
7. Pawn g3 - g4
7. Bishop h10 - i9
8. Pawn g2 - g3
8. Wizard g10 - f8
9. Bishop h1 x a8
9. Knight b10 x a8
10. Duke j3 - j5
10. Knight a8 - b6
11. Queen e1 - e4
11. Pawn a9 - a8
12. Knight i1 - h3
12. Pawn b9 - b7
13. Wizard g1 - e3
13. Pawn d8 - d7
14. Duke a3 - a5
14. Pawn d9 - d8
15. Cardinal d1 - e2
15. Bishop c10 - i4
16. Duke j5 - i5
16. Queen e10 - d9
17. Pawn j2 - j3
17. Bishop i4 x h3
18. Pawn i2 x h3
18. Wizard f8 - g6
19. Queen e4 - f3
19. Cardinal d10 - f8
20. Duke i5 - g5
20. Wizard g6 - h6
21. Duke g5 - h5
21. Wizard h6 - j4
22. King f1 - g2
22. 0-0
23. Rook a1 - i1
23. Rook h10 - f10
24. Queen f3 - e4
24. Knight b6 - c8
25. Rook i1 - i4
25. Wizard j4 x i4
26. Pawn j3 x i4
26. Pawn a8 - a7
27. Pawn h3 - h4
27. Pawn b7 - b6
28. Duke a5 - a6
28. Knight c8 - e7
29. Cardinal e2 - c4
29. Pawn c7 - c6
30. Cardinal c4 - e2
30. Knight e7 - d5
31. Knight c3 x d5
31. Pawn c6 x d5
32. Queen e4 - f4
32. Cardinal f8 - e7
33. Queen f4 - h6
33. Pawn h9 - h8
34. Rook j1 x j8
34. Pawn d7 - d6
35. Rook j8 - j1
35. Pawn d8 - d7
36. Queen h6 - i6
36. Rook f10 - f8
37. Queen i6 - j6
37. Pawn j9 - j8
38. Pawn e5 x d6
38. Cardinal e7 x d6
39. Pawn c2 - c5
39. Cardinal d6 - c7
40. Cardinal e2 - b5
40. Pawn d7 - d6
41. Pawn c5 x b6
41. Pawn a7 x b6
42. Duke a6 x b6
42. Rook a10 x a2
43. Queen j6 x e6
43. Rook a2 x b2
44. Wizard e3 x d5
44. Rook b2 x f2
45. King g2 - h3
45. Cardinal c7 - c8
46. Queen e6 - e4
46. Queen d9 - a9
47. Wizard d5 x d6
47. Queen a9 - a2
48. Wizard d6 x c8
48. Rook f2 x h2 Black check
49. King h3 - i3
49. Rook h2 - i2 Black check
50. King i3 - j4
50. Queen a2 - h2 Black check
51. King j4 - j5
51. Queen h2 - i3
52. Rook j1 - j4
52. Rook f8 - f7
53. Queen e4 x i8
53. Rook f7 - i7
54. Queen i8 - g10
54. King i10 - j9
55. Duke h5 - i5
55. Rook i2 - j2
56. Duke i5 x i7
56. Rook j2 x j4 Black check
57. King j5 - i5
57. Queen i3 x i4 Black check
58. King i5 - h6
58. Queen i4 x i7 Black check
59. King h6 - g6
59. Queen i7 - f7 Black check
60. King g6 - g5
60. Pawn h8 - h7
61. Queen g10 - c6
61. Bishop i9 x d4
62. Cardinal b5 - d3
62. Bishop d4 - h8
63. Queen c6 - i6
63. Bishop h8 - i7 Black check
64. Queen i6 x i7
64. Pawn j8 x i7
65. Wizard c8 - d6
65. Queen f7 - c10
66. Wizard d6 - d5
66. Queen c10 - c9
67. King g5 - f4
67. Rook j4 - j1
68. Duke b6 - e6
68. Rook j1 - d1
69. Duke e6 - e3
69. Rook d1 x d3
70. Duke e3 x d3
70. Pawn h7 - h6
71. Wizard d5 - d6
71. Pawn g8 - g6
72. Wizard d6 - e6
72. Pawn i7 - i6
73. Pawn g4 - g5
73. Pawn i6 - i5
74. Pawn g5 x h6
74. Pawn i5 - i4
75. Wizard e6 - g5
75. Queen c9 - c4
76. King f4 - e3
76. Queen c4 - i10
77. Wizard g5 - h7
77. King j9 - j10
78. Wizard h7 x g9
78. Queen i10 - e6 Black check
79. King e3 - d2
79. Queen e6 - a2 Black check
80. King d2 - e1
80. Pawn i4 - i3
81. Wizard g9 - i8 (lots of White checks from moves 81-97)
81. King j10 - j9
82. Wizard i8 - i7
82. King j9 - i10
83. King e1 - d1
83. Pawn i3 - i2
84. Wizard i7 - g9
84. King i10 - j10
85. Wizard g9 - i8
85. King j10 - i10
86. Wizard i8 - h8
86. King i10 - i9
87. Wizard h8 - h7
87. King i9 - i8
88. Wizard h7 - i7
88. King i8 - j8
89. Wizard i7 - h7
89. King j8 - j7
90. Wizard h7 - h8
90. King j7 - j8
91. Wizard h8 - h7
91. King j8 - i8
92. Wizard h7 - g7
92. King i8 - h8
93. Wizard g7 x g6
93. King h8 - h7
94. Wizard g6 - g7
94. King h7 x h6
95. Wizard g7 - f5
95. King h6 - h5
96. Wizard f5 - f6
96. King h5 - h6
97. Wizard f6 - f5
97. King h6 - i7
98. Wizard f5 - h3
98. Queen a2 - a1 black check
99. King d1 - c2
99. Pawn i2 - i1 = Queen on i1
100. Wizard h3 x i1
100. Queen a1 x i1
101. King c2 - b3
101. Queen i1 - e1
102. King b3 - c4
102. King i7 - h6
103. King c4 - d4
103. King h6 - g6
104. King d4 - d5
104. King g6 - f5
105. King d5 - c4
105. King f5 - e6
106. King c4 - b3
106. King e6 - d7
107. Duke d3 - d5
107. King d7 - c6
108. Duke d5 - g5
108. Queen e1 - c1
109. King b3 - b4
109. Queen c1 - c5 black check
110. King b4 - b3
110. King c6 - b5
111. King b3 - b2
111. Queen c5 - c4
112. King b2 - b1
112. Queen c4 - c3
113. King b1 - a2
113. King b5 - a4
114. Duke g5 - d5
114. Queen c3 - c2 black check
115. King a2 - a1
115. Queen c2 - d1 black check
116. King a1 - b2
116. Queen d1 x d5
117. King b2 - c3
117. King a4 - b5
118. King c3 - b2
118. Queen d5 - c4
119. King b2 - b1
119. Queen c4 - c3
120. Pawn g3 - g4
120. King b5 - b4
121. King b1 - a2
121. Queen c3 - c2 black check
122. King a2 - a1
122. King b4 - b3
123. Pawn g4 - g5
123. Queen c2 - b2
Game #4: This was another where ZOG played White, while I played Black. After another normal opening where I was planning on castling kingside, White made that difficult once again by agressive play. Pawns locked up the center of the board. I ended up castling queenside, while down slightly on material. Interestingly, White managed to manuever his Monarch to a fairly safe position on the kingside without castling by move 33. The board was set with opposing monarchs on opposite sides of the board.
Despite being down on material, I launched a long slow attack against the White King which was fronted by a phalynx of 4 pawns. What is most interesting about this game was that around move 41, White decided to move his queenside Duke towards my position, but through moving the pawns which guarded my King I was able to effectively cut off his Duke from effectively taking part in the battle. Meanwhile, my attack against White's defensive wall proceeded. Things came to a head on move 54 when one of my pawns took a pawn guarding the White King, putting him in check. I manuevered my queenside Duke to the kingside of the board to aid in the great attack. Meanwhile, the White Queen executed a brilliant set of defensive manuevers which nearly wiped out my entire attack before succoming to capture. The White Queen took a Pawn, a Knight, a Bishop, and my queenside Duke before falling in defense of her consort. This left me with a Rook and a Queen against a Rook, 2 Dukes, 2 Knights, and 2 Pawns. Unfortunately for White, the position was such that the White King was largely cut off from his most powerful troops (I have played games where 2 Dukes accompanying Pawns ground down an opposing Queen) Acting quickly, I achieved checkmate by nailing the coffin shut on the White Monarch with one remaining Pawn, my Rook and Queen.
1. Knight b1 - c3
2. Pawn e2 - e4
2. Pawn e9 - e6
3. Knight i1 - h3
3. Pawn f9 - f6
4. Pawn d3 - d5
4. Pawn e6 - e5
5. Pawn d2 - d3
5. Pawn i9 - i8
6. Bishop c1 x j8
6. Knight i10 x j8
7. Pawn g3 - g5
7. Bishop h10 - i9
8. Pawn g5 x f6 f6
8. Bishop i9 x f6
9. Pawn g2 - g5
9. Bishop f6 - i9
10. Pawn g5 - g6
10. Pawn d9 - d7
11. Cardinal d1 - h5
11. Knight b10 - c8
12. Wizard g1 - e3
12. Knight c8 - e7
13. Pawn f2 - f5
13. Pawn e5 - f4 x f5
14. Knight h3 x f4
14. Bishop i9 - e5
15. Queen e1 - h4
15. Wizard g10 - i9
16. Bishop h1 - f3
16. Bishop c10 - d9
17. Cardinal h5 - g5
17. Cardinal d10 - f8
18. Cardinal g5 x j8
18. Wizard i9 - g7
19. Cardinal j8 - h6
19. Queen e10 - e9
20. Cardinal h6 x g7
20. Cardinal f8 x g7
21. Duke j3 - j5
21. 0-0-0
22. Rook a1 - e1
22. Pawn h9 - h7
23. Pawn g6 x h7
23. Pawn g8 x h7
24. Rook j1 - g1
24. Cardinal g7 - h8
25. Bishop f3 - h5
25. Bishop d9 x h5
26. Queen h4 x h5
26. King c10 - b10
27. Knight f4 - e2
27. Pawn g9 - g6
28. Queen h5 - h4
28. Rook d10 - f10
29. King f1 - g2
29. Pawn j9 - j6
30. Duke a3 - a4
30. Pawn i8 - i7
31. Rook g1 - f1
31. Rook f10 - f9
32. Rook f1 x f9
32. Knight e7 x f9
33. King g2 - h1
33. Pawn h7 - h6
34. Rook e1 - f1
34. Knight f9 - g7
35. Wizard e3 - g4
35. Knight g7 - h5
36. Duke a4 - b4
36. Cardinal h8 - h7
37. Queen h4 - i4
37. Pawn i7 - i6
38. Duke j5 - j3
38. Pawn i6 - i5
39. Rook f1 - f7
39. Bishop e5 - g7
40. Queen i4 - f1
40. Duke a8 - d8
41. Duke b4 - b6
41. Pawn c9 - c7
42. Duke b6 - b7
42. Pawn b9 - b8
43. Knight e2 - d4
43. Pawn j6 - j5
44. Duke j3 - h3
44. Pawn i5 - i4
45. Duke h3 - h4
45. Queen e9 - d10
46. King h1 - i1 i1
46. Knight h5 - j4
47. Wizard g4 - g3
47. Pawn h6 - h5
48. Duke h4 - f4
48. Pawn g6 - g5
49. Duke f4 - f5
49. Pawn g5 - g4
50. Duke b7 - b4
50. Cardinal h7 - h6
51. Rook f7 - f9
51. Cardinal h6 - i5
52. Wizard g3 - g2
52. Knight j4 - i6
53. Wizard g2 - i3
53. Pawn g4 - g3
54. Wizard i3 x h5
54. Pawn g3 x h2 black check
55. King i1 x h2
55. Rook j10 - h10 The Black Rook holds the White Wizard hostage since the Wizard is the only defender of the White King at the moment.
56. Queen f1 - f3
56. Duke d8 - g8 Hustling the Black Duke over to participate in the attack.
57. King h2 - i1
57. Duke g8 - h8
58. Wizard h5 x i5
58. Bishop g7 x i5
59. Queen f3 x i6
59. Bishop i5 - g3 black check
60. King i1 - j1
60. Duke h8 - h6
61. Queen i6 x j5
61. Duke h6 - h4
62. Queen j5 - g5 white check. The White Queen is in the process of shredding my attack.
62. King b10 - a10
63. Queen g5 x g3
63. Duke h4 - h1
64. Queen g3 - i1
64. Duke h1 x i1
65. King j1 x i1
65. Queen d10 - h6 This move was probably the only viable move that would end the game quickly.
66. Duke f5 - h5
66. Queen h6 x h5
67. Pawn j2 - j5
67. Pawn i4 - i3
68. Rook f9 - f10
68. Rook h10 x f10
69. Knight d4 - f3
69. Rook f10 x f3
70. Knight c3 - e2
70. Rook f3 - f1
71. Knight e2 - g1
71. Rook f1 x g1
Game #5: My final example game was one of the wildest games I have ever played. Just for fun, I started off by playing Black. After move 25, I switched sides and played White for the rest of the game. The game started off with a flimsy attack by White that I quickly countered. After switching sides, I decided to launch an attack against Black's kingside, which I had castled to earlier in the game. After sacrificing the White Cardinal to open the position (no small sacrifice!), I continued to the attack with the White Wizard, a Duke, and the White Queen. Eventually, the material settled to where ZOG had a Knight and perhaps pawn advantage in material.
Meanwhile, the enemy King fled to the center of the board. While there, I launched the center pawns against his advanced position. It was starting to look as though my attack would fail when on moves 53 and 54, my lead Pawn finally reached the enemy position. I then hit on the idea of moving my Queen back to the h3 square where she would be backed up for a renewed attack by a fianchettoed Bishop. A combination of Rook / Cardinal and Rook / Wizard tradeoffs left the Black King vulnerable to wild attacks by the White Wizard since by this time, the Black position was rather scattered. Starting on move 69, the White Wizard and Queen executed a dazzling set of moves which kept the superior but still uncoordinated Black forces off balance. It still looked momentarily as though Black would be able to hold together, until I manuevered my Bishop to make a long ranged attack against the Black Rook on move 77. This barely left a big enough opening for the White Queen and Wizard to execute a wild set of boardwide manuevers which squeezed the enemy King into a position where he was mated on move 84. Unwittingly the mate was aided by his own Rook and Queen!
1. LPawn d8 - d6
2. Knight i1 - h3
2. Pawn c9 - c6
3. LPawn d3 - d5
3. Pawn c6 - c5
4. Pawn d2 - d3
4. Pawn d9 - d7
5. Bishop c1 x j8
5. Knight i10 x j8
6. Duke j3 - j5
6. Pawn i9 - i8
7. Knight c3 - b5
7. Wizard g10 - f8
8. Queen e1 - c3
8. Pawn h9 - h8
9. Duke j5 - g5
9. Bishop h10 - i9
10. Duke g5 - f5
10. Wizard f8 - e8
11. Wizard g1 - f3
11. 0-0
12. Cardinal d1 - d2
12. Knight b10 - c8
13. Cardinal d2 - h6
13. Pawn f9 - f8
14. Duke a3 - a4
14. Cardinal d10 - b8
15. Pawn i2 - i3
15. Knight c8 - e7
16. Duke f5 - i5
16. Bishop c10 - d9
17. Bishop h1 - j3
17. Pawn f8 - f7
18. Knight h3 - g5
18. Knight e7 - g6
19. Duke i5 - j5
19. Knight g6 - e5
20. Wizard f3 - h4
20. Duke a8 - a6
21. Duke a4 x a6
21. Bishop d9 x a6
22. Queen c3 - a5
22. Cardinal b8 - b7
23. Duke j5 x j8
23. Pawn a9 - a7
24. Duke j8 - j6
24. Cardinal b7 - b6
25. Queen a5 - d2
25. Bishop a6 x b5
26. Knight g5 - i6
26. Pawn i8 - i7
27. Knight i6 - j8
27. Bishop i9 x j8
28. Duke j6 x j8
28. Pawn i7 x h6
29. Queen d2 x h6
29. Cardinal b6 - d8
30. Queen h6 - i6 White check
30. King i10 - h9
31. Duke j8 x j9 White check
31. King h9 - g10
32. Wizard h4 - j6
32. Pawn h8 - h7
33. Wizard j6 - i8 White check
33. King g10 - f10
34. Queen i6 - i7
34. Knight e5 - g4
35. 0-0
35. King f10 - f9
36. Duke j9 x g9 White check
36. King f9 - f8
37. Duke g9 - i9
37. Rook h10 - j10
38. Bishop j3 - i2
38. Knight g4 - f6
39. Queen i7 - h6
39. LPawn g8 - g7
40. Queen h6 - i7
40. Knight f6 - g8
41. Queen i7 - h8
41. Cardinal d8 - g5
42. Pawn f2 - f4
42. Cardinal g5 - h5
43. LPawn g3 - g4
43. Cardinal h5 - i4
44. Pawn f4 - f5
44. Cardinal i4 x g2
45. LPawn g4 - g5
45. Cardinal g2 x d5
46. Pawn e2 - e4
46. Cardinal d5 - d4
47. Rook h1 - f1
47. Rook j10 - h10
48. Duke i9 - h9
48. Rook h10 x h9
49. Queen h8 x h9
49. Cardinal d4 x b2
50. Queen h9 x h7
50. Cardinal b2 x c2
51. Wizard i8 - h8
51. Bishop b5 x d3
52. Wizard h8 - h9
52. King f8 - e7
53. Pawn f5 - f6 White check
53. King e7 - d8
54. Queen h7 - h3
54. Wizard e8 - c7 This is a forced move on the part of the Black Wizard
55. Wizard h9 x f7
55. King d8 - c9
56. Rook f1 - f2
56. LPawn g7 x f6
57. Wizard f7 x d6
57. LPawn f6 x g5
58. Rook f2 x c2
58. Bishop d3 x c2
59. Rook a1 - c1
59. Bishop c2 - a4
60. Rook c1 x c5
60. Pawn b9 - b8
61. Rook c5 x c7
61. Pawn b8 x c7
62. Wizard d6 - e8 White check
62. King c9 - b8
63. Queen h3 - a3
63. Queen e10 - f9
64. Wizard e8 - g6
64. Queen f9 - f1
65. Bishop i2 - h1
65. Queen f1 - b5 Black executes a series of theatening manuevers to protect the Black Bishop. This shows how scattered Black's forces are.
66. Wizard g6 - h8
66. Knight g8 - h10
67. Wizard h8 - f7
67. Pawn d7 - d6
68. Wizard f7 x e9
68. LPawn g5 - g4
69. Wizard e9 - d9 White check
69. King b8 - c8
70. Wizard d9 - e7 White check
70. King c8 - b9 b9
71. Queen a3 - g3
71. Bishop a4 - d1
72. Queen g3 - f4
72. Rook a10 - e10
73. Wizard e7 - d5
73. Queen b5 - d7 This is a forced move by the Black Queen. The White Wizard threatens to fork the Black Queen and Black King.
74. Queen f4 - j8
74. Knight h10 - f9
75. Wizard d5 - b7
75. King b9 - b10
76. Wizard b7 x a7
76. Rook e10 - e8
77. Queen j8 - j10
77. Knight f9 - d10
78. Bishop h1 - j3
78. Rook e8 - f8
79. Queen j10 - e10
79. Rook f8 - b8
80. Queen e10 - j10
80. King b10 - a9
81. Wizard a7 - c9 The White Wizard threatens the Black Queen.
81. Rook b8 - d8
82. Wizard c9 - c10 White check. The Wizard is protected by the White Bishop far away on j3.
82. King a9 - b9
83. Queen j10 - b2 White Check. The Queen moved to the opposite side of the board to deliver this!
83. King b9 - c8
84. Queen b2 - b8 Checkmate!
Best regards to everyone at Chess Variants. It is great to see a site celebrate its 10th anniversary. I hope you give Magi a try!
Neal Meyer
Written by Neal Meyer.
Webpage made: May 1, 2005.