P I L L A R S O F M E D U S A
A game of strategy and tactics.
This document is a condensed and slightly modified version of the
pamphlet entitled,
"How to Make and Play Medusa Chess" © 1997 by Gary K.
Gifford.*
* The game was renamed to Pillars of Medusa in 2003 when it came to
my attention that another
game known as Medusa Chess already existed.
Origin of "Pillars of Medusa"
I created Pillars of Medusa for my in progress fantasy novel, Orions Sword. In the novel the Zeus-like god Winstor created Pillars of Medusa as a game requiring great feats of calculation and imagination. Winstors game also stood as a symbol of life, in that people started out as statues, were given the power of life, and were influenced by the gods.
Pillars of Medusa is based largely upon Turkish Great Chess (circa 1797). It is in Turkish Great Chess that we find one piece which has the combined moves of Bishop and Knight (the vizir); another which moves like Rook or Knight (war machine), and a third which moves like Queen or Knight (giraffe); these three being in addition to the normal chess army and taking place on a 10x10 board.
Pillars of Medusa contains equivalents of the standard chess pieces, the three special Turkish pieces, plus two additional pieces [the Morph and the Medusa], which are discussed in the next section. In addition, the board has been expanded to 121 squares (11 x 11).

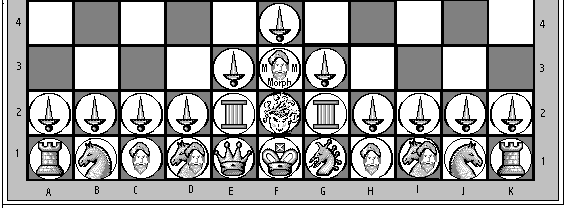
Whites Initial Setup
The Medusa has the ability to freeze all of the opponents pieces, which reside on squares adjacent to it. The Morph has the option of changing into the piece it captures (however it now serves your army and it is still a Morph). These pieces, along with all others, are discussed in the section, How the Pieces Move.
Object of the Game
Pillars of Medusa is played by two players, one having light pieces (traditionally white), and the other having dark pieces (traditionally black). The object of the game, as in traditional Chess and Turkish Great Chess, is to checkmate your opponents king. A king is checkmated when you threaten to capture it on your next turn, and the capture of the king cannot be prevented. Another objective of the game, equally important, is to prevent your own king from becoming checkmated. Checkmates are illustrated later in this booklet. Note that the principles of stalemate apply to Pillars of Medusa, as in traditional chess.
How the Pieces Move
This section discusses the movement of pieces. Where possible, piece movements are compared with traditional Chess movements.
|
Name & Quantity |
Chess Equivalent |
Movement of the Pillars of Medusa Pieces, and Special Comments |
|
|
|
Sword (11) |
Pawn (8) |
Swords move and capture like pawns; with the following exceptions: (a) their is no "pawn en passant," (b) Swords can only promote to a Medusa, (c) Swords which have not yet reached their armys forth row can move 2 spaces. Thus, for White a Sword on D2 can move to D3 or D4; a Sword on E3 could move to E4 or E5. If the Sword on D2 moves to D3, White can still move the Sword two spaces on his next turn, as the Sword has nor reached the fourth row. Note: The Sword on F4 can only move one space since it starts on the fourth row. For Black pieces, the movement of Swords is relative to the movements just described. Note: Morph Swords promote to a normal Medusa (not a Morph version). also see Morph. |
|
|
Tower (2) |
Rook (2) |
Towers move like rooks. The only difference in movement is during castling. In Pillars of Medusa, the rules of castling are the same as those in standard chess, with this exception: to castle to either side, the King and the involved-sides Tower trade places. |
|
|
Horse (2) |
Knight (2) |
The Horse moves like the Knight. |
|
|
Advisor (2) |
Bishop (2) |
The Advisor moves like the Bishop. |
|
|
Mounted Advisor (2) |
--- n/a ---- |
The Mounted-Advisor moves like a Bishop, or a Knight. For example, on Whites first move the Mounted-Advisor on D1 could move to C3. On the next move, this Mounted-Advisor could move like a Bishop or a Knight. |
|
|
Queen (1) |
Queen (1) |
The Queen moves like the standard chess Queen. |
|
|
King (1) |
King (1) |
The King moves like the standard chess King; with exception to castling, as described with the Tower movement. |
|
|
Serpent (1) |
--- n/a ---- |
The Serpent moves like a Queen or a Knight. Another way of thinking is that the Serpent moves like a Bishop, Knight, or Rook. Whites Serpent can leap like a Knight from G1 to H3 on one move; then move like a Bishop, Knight, or Rook on the following turn. This is a very powerful piece. |
|
|
Pillar (2) |
--- n/a ---- |
The Pillar moves like a Knight or Rook. Despite their Rook-movement capability, Pillars are never involved in castling. |
|
|
Medusa (1) |
--- n/a ---- |
The Medusa moves like the standard chess Queen, but is limited to movement of up to three squares at a time. The Medusa, in addition to capturing pieces, will "turn adjacent-square pieces to stone." When the Medusa moves, such that petrified pieces are no longer adjacent to her, those pieces are once again free to move. It should also be noted that pieces are capable of traveling through spaces adjacent to Medusas [without turning to stone] as long as they dont end their movement on such a space; if so they would then turn to stone on that space. |
|
*Starts as a Morph Bishop. |
Morph (1) |
--- n/a ---- |
The Morph is unique in that it can move like any piece captured, including Sword. The Morph starts out as an Advisor (moving like an ordinary Bishop), but when your Morph captures an opponents piece, you have the option of transforming your Morph to that piece. And it still remains a Morph. There a special condition which is: if your Morph captures another Morph you can still have your piece transform; but in this case your Morph would loose its morphing ability. Here are a few examples from a possible game:
|
A Sample Game
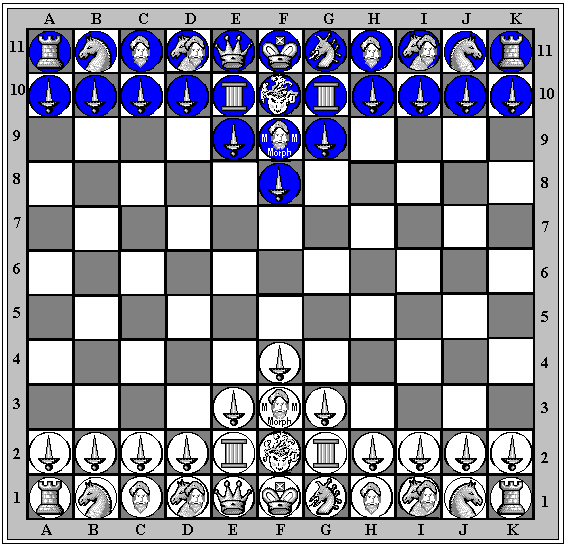
In this game white puts his Medusa to work early and tears up blacks A-side of the board. In the final moments of the game the white Medusa deflects its black counterpart, allowing for a clever checkmate. Algebraic notation has been used, with a square A1 positioned at whites left and square K11 at blacks left. The following chess notation symbols are used in Pillars of Medusa.
|
T - Tower H - Horse A - Advisor MA - Mounted Advisor Q - Queen K - King S - Serpent P - Pillar ME - Medusa (*) - Morph, see following note. |
|
* The Morph is represented in notation by the letter of the piece enclosed with parenthesis. For example: (T) is a Tower Morph, (ME) is a Medusa Morph. The Morph always starts out as an Advisor Morph (A). |
|
When no piece designation is provided (see previous listing), the move being made is by a Sword. For example, whites first, E3 - E5 means the Sword on E3 is moving to E5.
|
White |
Black |
Comments |
|
|
1 |
E3 - E5 |
H10 - H8 |
|
|
2 |
ME - C5 |
G9 -G7 |
|
|
3 |
P - C3 |
P - I9 |
Note: P is "Pillar" not a pawn (see above table). |
| 4 | S - D4 | P - D8 ??? | Attacking the white Serpent, but allowing a powerful Medusa move. |
|
5 |
ME - C8 + |
. . . |
Turning the Pillar to stone and checking the black King. |
|
. . . |
MA - E10 |
Using his Mounted-Advisor to block the check. Black avoids D10 - D9 because White could reply 6. ME x D9 which would keep the Pillar frozen, as well as turn the Swords on C10 and E9 to stone. |
|
|
6 |
(A) - B7 |
H - A9 |
Blacks Horse attacks the Advisor Morph and the Medusa at the same time. |
|
|||
|
7 |
ME x D8 |
MA x B7 |
The Sword on E9 is "Stone" and can not capture the Medusa. |
|
8 |
ME x B10 |
Q - E10 |
After 8. ME x B10, blacks pieces on A9, A10, A11, C10, & C11 all were "Turned to stone." In addition, whites Medusa threatened the Mounted-Advisor on B7. |
|
9 |
ME x A11 |
MA - A6+ |
|
|
10 |
D3 |
ME - E11 |
|
|
11 |
ME x A10 |
Q - D9 |
Black moves his Queen to D9 to protect his Horse, as well as attack whites valuable Serpent. |
|
12 |
P - D5 |
S - F10 |
Blacks Serpent move reinforces his Queen. |
|
13 |
MA - E3 |
MA - G10 |
|
|
14 |
MA - C4 |
MA x C4 |
White played 14. MA - C4 to try to kick out blacks Mounted-Advisor. |
|
15 |
S x C4 |
(A) - D7 |
Black moves his Morph-Advisor to attack the white Medusa (which has inflicted a great deal of damage). |
|
16 |
ME - B10 |
S - D11 ??? [Dia. No. 1] |
Black wants his Serpent to capture the Medusa. |
|
|||
|
White |
Black |
Comments |
|
|
17 |
ME x C11 |
H - H10 |
Black knows hes in trouble. He concludes that his best strategy is to castle, then hang in there until his opponent slips. |
|
18 |
MA - J3 |
MA - E8 |
|
|
19 |
P - I3 |
A - F9 |
|
|
20 |
P x I9 |
J x I9 |
|
|
21 |
MA x E8 |
A x E8 |
|
|
22 |
P x D7 |
A x D7 |
|
|
23 |
S x I10 |
T - H11 |
After 23. S x I10, black can forget about castling. Note that prior to blacks response, the Serpent simultaneously attacked the Tower and Horse. Black moved his Tower to protect the Horse. What protects the Tower? |
|
24 |
ME x D11 ! |
ME x D11 |
|
|
|||
|
25 |
S - G9 # |
[Dia. No. 2] |
Dia. 2 Partial position after 25. S - G9 # |
Medusa Self Test
This test consists of three problems, each with a partial board. In each case you do not need to be concerned with what might appear on other squares, which arent shown. However, in a real game you must constantly look over the entire board.
The purpose of the test is to find out how well you do. If you do poorly on the test, dont be discouraged. In fact, if you get each problem wrong, its not so bad as long as you understand the correct answer when it is shown later.
Until you are confident on how each piece moves, please make use of the movement table on pages 2 and 3.
Answers to the problems appear on the last page of this document..
|
|
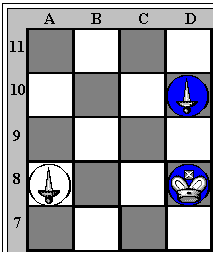
Problem 1: The white sword on A8 is about to move in an attempt to get to A11 where it will be promoted. Question: Can blacks King stop the sword, or capture it as soon as it promotes? |
|
Problem 1, White to move |
|
|
|
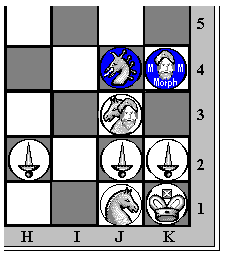
Problem 2: How does black win from this position? |
|
Problem 2, Black to move |
|
|
|
Problem 3: Black can win quickly from this position. What is blacks best move? |
|
Problem 3, Black to move |
Questions and Answers
The following questions are answered by the game's creator.
- Why cant one Medusa turn another to stone?
- Regular chess is complex enough. And its been around for thousands of years. Why do you want to go and change it? (this question is from an electronics engineer).
- Will playing Pillars of Medusa hurt my regular chess?
Answer: Game testing indicated that Medusa immunity (from each others stares) provided for a much better game than would result from the Medusas turning each other to stone. Also, from a mythological stand point, Medusa had two sisters they saw each other without turning to stone (mythological speaking, of course).
Answer: To me the complexity aspect is not an issue, and although I have not mastered standard chess by any means, I still enjoy the extra challenge of Pillars of Medusa. On a different note, the thousands of years chess has been around is misleading. Our version has only been in its current form since the 1400s. The ancient version played in Persia and India was a bit different. And then there is Chinese Chess (Xianqi), Japanese Chess (Shogi), and Turkish Great Chess, not to mention the many variations of western chess. As far as changing chess, I am not proposing that Pillars of Medusa replace western chess. However, since the game exists in my novel and in my mind, I would like to give others a chance to experience this extremely challenging game.
Answer: From my experience and from research material Ive read, "no." Many musicians play several different instruments, many artists master more than one media, and many strategic game players are good at many different strategic games. If anything, playing Pillars of Medusa should enhance your regular game by expanding you analytical abilities, and by increasing your board vision, i.e., your ability to look over more of the board at once. Strategic and tactical skills should improve. Note: One variation of chess that I personally frown upon is "Give-away Chess (Anti-Chess)" where players try to intentionally lose material. I see that version as negative mental programming.
- If I move a piece such that it travels next to a Medusa, but is intended to move past it, does the piece turn to stone when it is one square from the Medusa? Or can it move right on by, unaffected?
Answer: The piece moves by, unaffected. For example, assume a Tower on A1 has a clear file all the way to A11, and the opponents Medusa is on B6. The Tower can move to A11. However, if the Tower moved to A5, A6, or A7 it would be turned to stone upon completion of the move.
Test Answers
How to make an Inexpensive Pillars of Medusa Set
Disk Set
The easiest set to make involves using disks (such as checkers) and gluing the piece symbols to them. The reverse side of the disk should have the symbol of the opposing players Morph version. For example: A disk with a White horse would have a Dark Morph Horse on the flip-side. This is convenient because when you capture a piece or pawn with a Morph, just flip the captured piece over to reveal the new Morph, assuming that you want the Morph to assume the new identity.
Please send questions or comments to Gary Gifford.


