Clash of Command
By Peter Stobbe
Introduction
Clash of Command was made for the 41-squares Chess Variant Design Contest. It was inspired by a variety of games, including: Checkers, Fanorona, Cuarenta, Tishai, Alice Chess, Total Annihilation (computer game), plus probably several more that I'm forgetting.Although I'm sure there already is one, I didn't know of a chess variant where pieces are regularly added to the board, that doesn't require you to capture them first and "recycle" them (like Shogi). I wanted to play something that vaguely mimics the build-up of forces and ensuing conflict that characterizes real-time strategy games. When I realized that 41 squares made a nice square board of sorts, I knew I had to use it. Due to the unique board, I designed pieces which have no obvious analogues in Chess, so I gave them odd names and shapes which would not be confused with pieces from any other variant.
Board
The board is a graph with 41 nodes:

      9 +---+---+---+---+
        |\ / \ / \ / \ /|
      8 | +---+---+---+ |
        |/|\ / \ / \ /|\|
      7 + | +---+---+ | +
        |\|/|\ / \ /|\|/|
      6 | + | +---+ | + |
        |/|\|/|\ /|\|/|\|
      5 + | + | + | + | +
        |\|/|\|/ \|/|\|/|
      4 | + | +---+ | + |
        |/|\|/ \ / \|/|\|
      3 + | +---+---+ | +
        |\|/ \ / \ / \|/|
      2 | +---+---+---+ |
        |/ \ / \ / \ / \|
      1 +---+---+---+---+
        a b c d e f g h i
Pieces occupy the nodes of the graph. See below for the initial setup. As in Chess, white pieces start on the lower half of the board and move "forward" up the board; black pieces start on the upper half of the board and move "forward" down the board. The white and black circles show where pieces promote.
Game Goal
A player wins when their opponent has no more Commanders on the board.General Rules
- Movement is always along the lines on the board.
- Any piece that reaches the opponent's back row transforms to a Slicer.
- Unlike standard chess, you may capture your own pieces.
Piece Descriptions
Moving "forward" means diagonally forward or straight forward, but only along a line.Droid
- A Droid moves one node forward to an empty node.
- Or it captures by moving sideways or backwards (straight backwards or diagonally) onto a piece.
- Whether capturing or not, a Droid transforms to a Hawk after moving.
Hawk
- A Hawk moves one node forward to an empty node.
- Or it captures in any direction in one of three ways:
- jumping (eg. move a1 - c3, capturing on b2)
- approaching (eg. move a1 - b2, capturing on c3)
- withdrawing (eg. move b2 - a1, capturing on c3)
- Whether capturing or not, a Hawk transforms to a Droid after moving.
Factor
- A Factor moves one node forward to an empty node, leaving behind a Droid or Hawk (which is added to the board from an off-board supply)
- Or it transforms without moving to a Droid or Hawk, which counts as a player's turn.
Commander
- A Commander moves forward one node to an empty node, leaving behind a Factor or Brute (which is added to the board from an off-board supply)
- Or it transforms without moving to a Factor or Brute, which counts as a player's turn.
Brute
- A Brute may capture by moving onto a piece one node away in any direction.
- Or it may capture by moving onto a piece two nodes away. In this case, it may move one node in any direction then another node in any direction, as long as it ends up on a piece and does not pass over a piece.
- In any case, it may not move without capturing a piece.
Slicer
- A Slicer moves any number of nodes in any direction, capturing all pieces it encounters along the way.
- However, it may not move without capturing at least one piece.
Setup
This is the initial setup:
White: Droid c3, g3; Hawk e3, i3; Brute i1; Factor b2, d2, f2, h2; Commander a1, c1, e1, g1.
Black: Droid c7, g7; Hawk a7, e7; Brute a9; Factor b8, d8, f8, h8; Commander c9, e9, g9, i9.
Examples
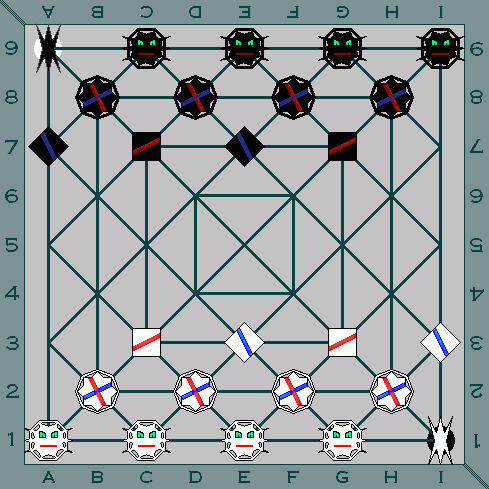
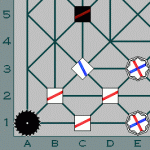
 Black to move. His moves include:
- move the Droid c5 - d4 (transforming to a Hawk)
- transform the Factor on a5 to a Droid or Hawk.
- move the Factor a5 - a3, leaving behind either a Droid or Hawk on a5.
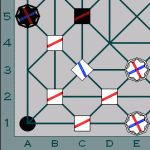
 White captures the Factor b4 x a3.
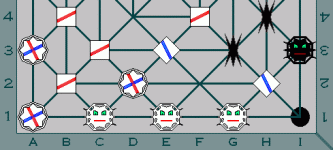
 Possible moves with the Black Hawk:
- a5 - b4 (transforming to Droid)
- a5 - b4 x c3 (transforming to Droid)
- a5 - a1 x a3 (transforming to Slicer)
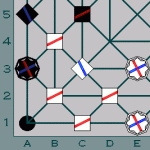
 White should capture the Slicer either with b2 x a1, or c1 x a1. (In either case the Droid moved would
transform to a Hawk.)
White should capture the Slicer either with b2 x a1, or c1 x a1. (In either case the Droid moved would
transform to a Hawk.)
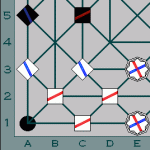
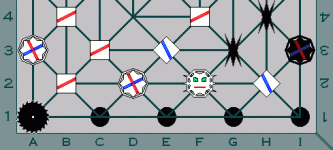
 Here is an example of Brute movement. The Black Brute may move to the marked nodes.
Note that in the diagram, Black is going to lose in a few turns if White plays correctly.
 Another example.
Black to move. The Commander moves forward i3 - i1, leaving behind a Factor on i3, and transforming to a
Slicer.
 White can now try to save one of his Commanders: g1 - f2, Brute on g1
 Black can use the Slicer to good effect: i1 x a1 x c1 x e1 x g1
 This is why you try not to let your opponent's pieces promote to Slicers. If you do, then usually the game
is quickly over.
This is why you try not to let your opponent's pieces promote to Slicers. If you do, then usually the game
is quickly over.
Notes
- Hawks and Droids should be physically identical pieces. That is, they are different sides of the same flat piece. To transform from one to the other, you just flip them over and rotate them. (Although I suppose you could use Transformers-type toys for a really fancy set.)
- Players cannot run out of a type of piece. I suggest that each player have about 20 Hawk/Droid pieces, 10 Factors, 10 Brutes, 4 Commanders, and 2 Slicers. This is like in Chess, where it is theoretically possible to promote all your pawns to queens, but in practice you need only one or two. Naturally, this is not an issue with the Zillions implementation.
- Commanders are not "royal"; it is legal to leave them in check. You can even capture them yourself.
- Draws are impossible. Really!
Zillions of Games
- You can download the Zillions implementation:
- Included as variants are a few alternate setups.
- It is not difficult to beat the computer; it eagerly moves its Commanders forward, letting them be captured for no good reason. If you wish, you can edit the zrf to increase the value that the computer assigns to Commanders (instructions described in the file).
Written by Peter Stobbe.
WWW page created: March 8, 2001. Last modified: March 14, 2001.