Piececlopedia: Withdrawer
Historical notes
The Withdrawer was invented by Robert Abbott for his game Ultima. The rules for Ultima were first published in 1962. The Withdrawer's method of capturing is taken from the Malgasy game of Fanorona.The Withdrawer is also used in Rococo, Chess on a Long Board with a Few Pieces Added, and Withdrawer Chess.
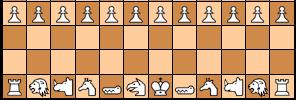
In Ultima, which is designed to be played with a standard chess set, the Withdrawer is represented by the Queen. In Rococo, the Withdrawer is represented by an ox. I have used the ox for the diagrams below.
Movement
The Withdrawer's methods of movement and capture are different from each other.The Withdrawer moves as a chess Queen - that is, the Withdrawer can move any number of squares in any direction, orthogonally or diagonally, as long as all the squares it passes over are unoccupied by other pieces. The Withdrawer can never move to a square occupied by a piece of either side.
To capture, the Withdrawer must be adjacent to an enemy piece, and then move directly away from that piece. Again, the Withdrawer can cross any number of unoccupied squares in any direction. In Rococo, if the Withdrawer moves directly away from a piece, capturing that piece is not optional - the piece must be removed. The rules for Ultima do not clarify whether capturing is optional or not.
Movement diagrams
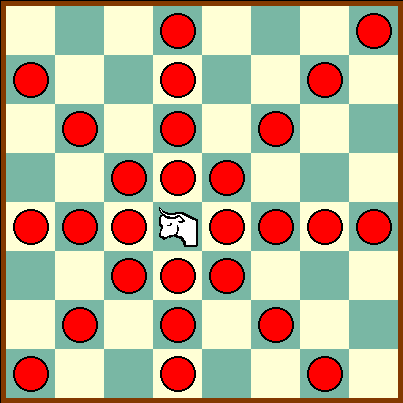
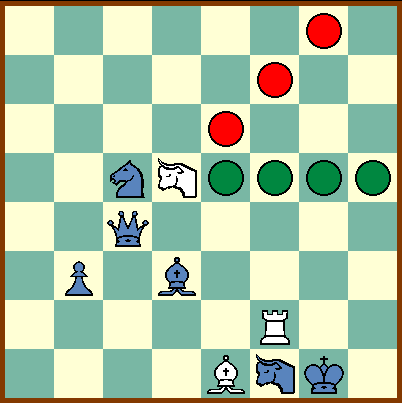
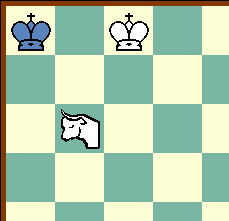
In the diagram on the left, the Withdrawer - represented by an ox - can move to any of the squares marked with a red circle.In the diagram on the right, the White Withdrawer can capture either the Black Queen - by moving to any of the squares marked by a red circle - or the Black Knight - by moving to any of the squares marked with a green circle. Note that if the Withdrawer captures the Knight, it will not capture the Queen, because it did not move directly away from her. Likewise if the Withdrawer captures the Knight it will not capture the Queen; the Withdrawer can only capture one piece per move. The Withdrawer can not capture the Bishop or the Pawn because it is not adjacent to either of them.
The Black Withdrawer can not capture the Rook or the Bishop. Capturing the Rook would require the Withdrawer to move off the board, which it can not do, and the capturing path away from the Bishop is blocked by the Withdrawer's own King.
You can also see an animated demonstration of the Rococo pieces, including the Withdrawer, by clicking here. There is also a page of animated demonstrations for the Ultima pieces here; on this page a different symbol is used to represent the Withdrawer.
Remarks
The value of the Withdrawer is somewhat dependent on the other pieces on the board. In Ultima and Rococo, the Pawns are fairly mobile and their method of capture allows them to defend well against Withdrawer attacks. Against the standard chess army the Withdrawer does somewhat better, especially since Pawns have a much more difficult time escaping Withdrawer attacks and thus are more dependent on other pieces for their protection.The Withdrawer's strength is that since it doesn't capture by displacement, opposing pieces can't be protected by direct defense. Each piece potentially has eight locations where it is vulnerable to Withdrawer attack. Furthermore, once a Withdrawer is in position, it will generally have multiple locations it can move to in order to effect the capture, which can be difficult if not impossible to defend against. Often when a piece is threatened by a Withdrawer, its only option for escaping capture is to move to a different location.
The Withdrawer's biggest weakness, of course, is that in order to capture, it has to get next to the opposing piece. This makes it more useful against pieces that don't move to adjacent squares - such as Knights - but less useful against pieces such as the Queen, the King, the Chameleon, the Swapper, and other Withdrawers, and completely useless against the Immobilizer. Since the Withdrawer doesn't jump, opposing pieces behind enemy lines tend to be safe from capture. On a crowded board the Withdrawer's path may be easily blocked.
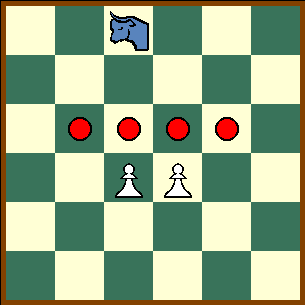
Standard chess Pawns are not as helpless against the Withdrawer as I originally predicted. To start off, the Pawn itself protects two important squares. Additionally, it is difficult for a Withdrawer to get behind a Pawn, and once it does, it must move towards the enemy army in order to effect a capture. That leaves three squares - the front and the two sides - that must be protected by the rest of the army, and I have found the standard chess pieces to be surprisingly effective in doing so, at least in the opening and middle game. One effective method of defense against Withdrawers is to put Pawns on horizontally adjacent squares - in the diagram below the two White Pawns attack all the squares marked with a red circle, meaning the Withdrawer must get around them in order to threaten capture. The drawback to Pawns arranged thusly, however, is that they do not protect each other and therefore may be vulnerable to capture by other pieces.
On the other hand, in the endgame isolated Pawns are particularly helpless against the Withdrawer - there are less pieces to defend the squares around the Pawns, there is more open space for the Withdrawer to use for captures, and it is easier to the Withdrawer to get behind enemy Pawns.
Note that it is possible for a Withdrawer to be attacked by another Withdrawer without attacking it back.
In an endgame of a Withdrawer and King versus a lone King, the Withdrawer can not checkmate the lone King even if the King cooperates. Since the Withdrawer must be adjacent to the lone King, his own King must provide protection for him, which will block the Withdrawer's retreat path.
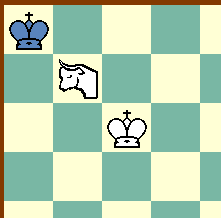
On a standard rectangular board, the Withdrawer and King can force stalemate against a lone King. Since stalemate is a win for the stalemating player in both Ultima and Rococo, this is useful to know. The diagram below shows the upper left corner of a Withdrawer stalemate. This position can be forced.
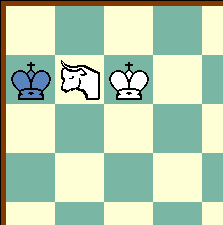
The following two diagrams also show Withdrawer stalemates. Neither of these positions, however, can be forced if Black is resisting, except in situations where it is White to move, in which case it is not stalemate. Therefore, in actual play you should be striving for the position above, not the positions below.
In Rococo, the game is played on a ring board. On the ring board, the King and Withdrawer can force checkmate against a lone King. The diagram below shows the final position.

AI Art

This is an item in the Piececlopedia: an overview of different (fairy) chess pieces.
Written by Benjamin C Good.
WWW page created: September 9, 1998.